Back in 2020 we were tasked to produce an original sponsorship ident for Betfair. Our concept was simple, go into the mind and body of the bettor with strikingly futuristic visual take on the Betfair experience with a soundtrack with instantly recognisable emotional triggers.
Executed in just 3 weeks from concept to delivery, here’s a breakdown of our execution from our 3D guru Jonathan who oversaw the 3D.
Blocking out
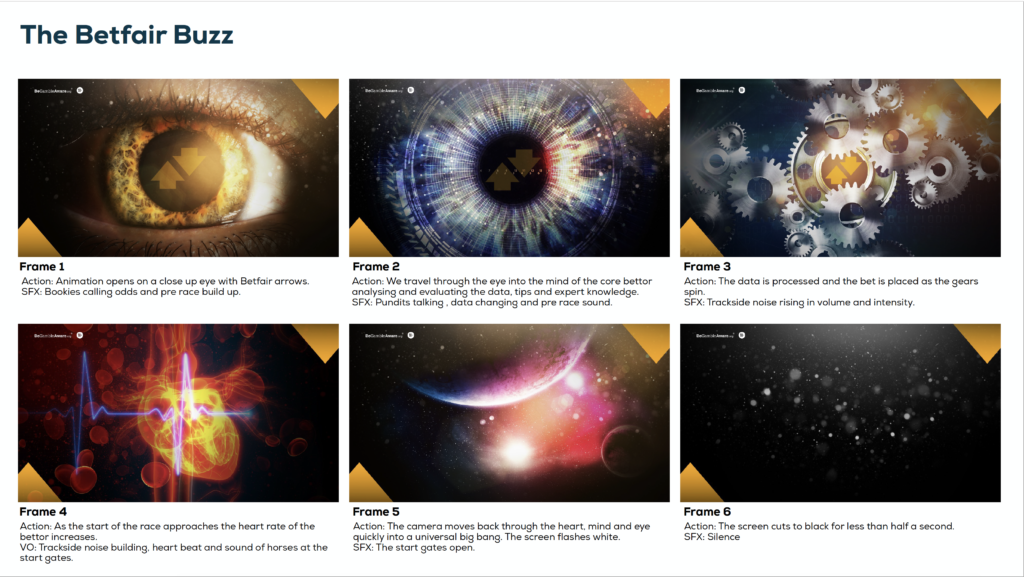
We had a really short timeframe to complete the ident so once the storyboard was signed off the first step was to create a very simple animation where we blocked out the journey through each scene. This enabled us to get a good understanding of how fast the camera would be moving, and how much of each scene would be registered by the viewer before reaching the climatic end shot.
Originally there were 5 sections to travel through, but blocking out the animation with simple geometry highlighted the need to reduce this in order to allow for a build-up at the start and hang-time on the endframe.
The Build
The camera move was animated in Cinema4D with a simple align to spline setup, which we also used to define the data tunnel behind the pupil of the eye, and the time needed to travel through the clockwork chamber towards the heart
The Data Tunnel
The integration between Cinema4D and After Effects gave us the camera data and 3D positioning of various elements in each scene to allow us to enhance the ident with 2D elements during compositing. This was used to greatest effect in the data tunnel as we enter the pupil, where simple animated shape layers were combined with a number of 3D render passes to create the sense of a digital tunnel. We were also aware the client was keen to add logos in, so having the camera and positional data from C4D available in After Effects meant we could do this on the fly with the flexibility to edit without needing to re-render any 3D elements.
The Cogs
The clockwork, or cogs chamber, made use of Cinema4D’s built-in cog wheel generator. We wanted the viewer to feel like they were moving through a vast landscape of oversized mechanics so bringing some of the cogs closer to the path of the camera, and travelling directly through a few of them helped us achieve this.
Texturing on the Cogs was kept very simple because we were aware that once we added motion blur in compositing, the speed at which we moved through the scene meant we didn’t need to worry too much about granular details. In fact the main consideration was setting up a lighting environment that gave us a good atmosphere and enough specular highlights to pull out in the composite. The setup included an HDRI for good reflections, volumetric lights for some atmospheric lighting, and a few Omni lights with falloff positioned near to the teeth of a few select cogs.
The Heart
Without the time available to model and rig our own heart asset, we re-purposed a stock model that came with a pre-existing “beat” – but required retiming and re-texturing to fit within our world and work with the overall pace of the ident.
With the client wanting us to include an ECG waveform within the animation, we wanted to use this as the motivator for their brandmark to “come alive” and act as the crescendo to our journey. Aside from texturing the heart model with some bespoke native C4D textures, we output several passes that allowed us to add the brandmark in post – in case they decided against it later on.
The composite
The renders we took out of Cinema4D were fairly flat, but we knew how far we’d be able to push them in After Effects. We left all depth of field out of our renders and instead used 16 bit RPA image passes with a rear camera blur set on the camera in Cinema4D. We used Frischluft in After Effects to add DOF in the composite, giving us the ability to pick and animate our focal point in post. We also used the new Red Giant VFX Complete suite to enhance the look of our shots with deeper shadows and specular glows confined to highlights. Lastly, motion blur was added using the RSMB plugin.
The Grade
Taking the ident to grade was made simple thanks to the passes we could easily render out of Cinema4D. In total we sent about 15 mattes to the grade to give us more control over precise colours as precise moments of each scene.
The Timeline
Here you can see a timeline of our build, starting with our simple blocking-out camera animation, to wireframes for pre-visualisation, and the subsequent stages of modelling, texturing, lighting and compositing each section of the ident.